Choosing a bubble mailer size means looking past the product’s flat length and width. You need the packed width, packed length, and thickness — plus room for rigid corners and the cushioning layer itself. The bubble lining occupies interior space, so a mailer whose printed size looks generous can offer less working room than a plain poly mailer of the same exterior dimensions. Measure the product as it will actually ship, compare against usable interior dimensions rather than exterior figures, leave enough room for clean insertion and sealing, and confirm fit before committing to custom printed production.
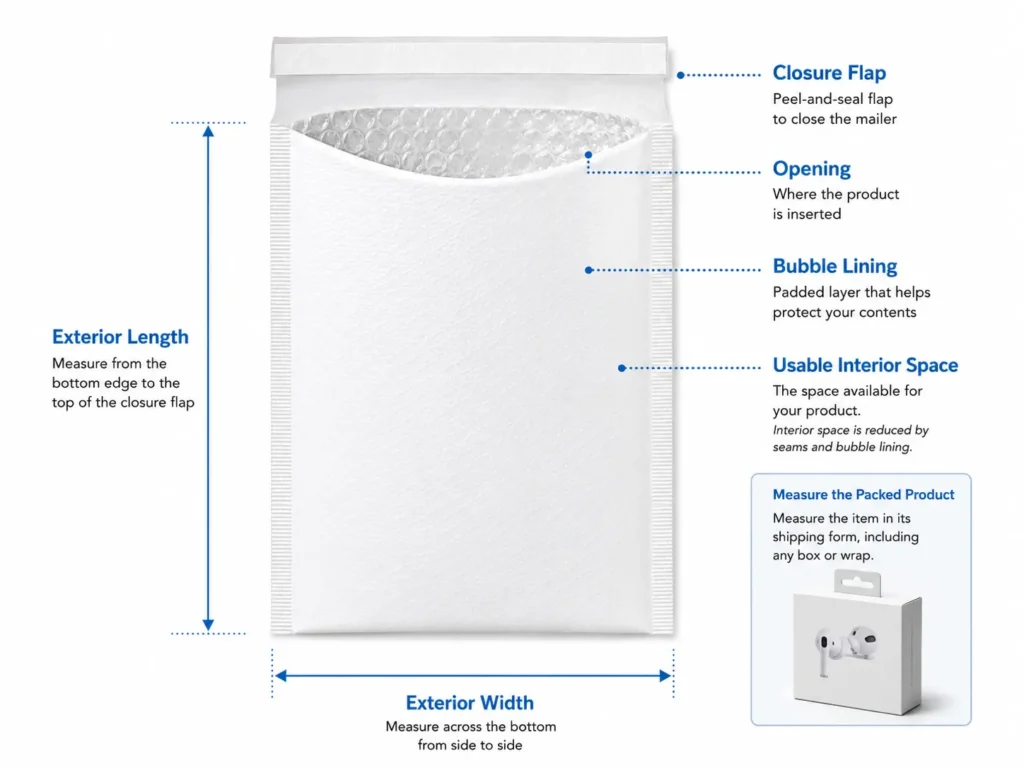
How Bubble Mailer Sizes Are Measured
Exterior Dimensions vs. Usable Interior Space
The size printed on a bubble mailer does not always represent the full space available for the product inside.
Bubble mailers are typically described using exterior dimensions — the outside width and length of the finished mailer. But several elements of the construction sit between that outer measurement and the space your product actually occupies:
- The bubble lining, which lines the interior on both faces
- Side seams, where the two faces are joined
- The bottom seam
- The closure area at the opening
Each consumes part of the nominal footprint. How much varies with the mailer’s construction, the lining used, and how the seams are formed — which is why a fixed deduction figure isn’t reliable across suppliers.
For procurement purposes, the practical response is to ask for usable interior dimensions rather than working backward from exterior figures.
Does the Closure Flap Count Toward Length?
This varies by supplier, and it changes the number materially.
Some suppliers state length to the end of the closure flap. Others measure only to the seal line, treating the flap as additional. Two mailers listed at the same length can therefore differ in how much of that length is actually available for the product.
Before ordering in volume, confirm:
- Whether the stated length includes the closure flap or stops at the seal line
- Whether figures given are exterior or usable interior dimensions
- Which side the mailer opens on
- How the side and bottom seals are constructed
If you’re comparing quotes from multiple suppliers, ask all of them the same question in the same terms. Otherwise you’re comparing numbers that don’t describe the same thing.
What Do #000, #0, #1 and Other Bubble Mailer Numbers Mean?
Bubble mailers are commonly sold using a trade-size numbering system — #000, #00, #0, #1, #2 and upward — where higher numbers generally indicate larger mailers.
These numbers are useful shorthand within a catalog. They are not a guaranteed industry standard. Actual dimensions associated with a given trade number can vary between suppliers and between product constructions, and the usable interior space behind the same number can vary even more.
For B2B ordering, treat the trade number as a reference, not a specification. Place orders against the actual stated dimensions, and confirm whether those dimensions are exterior or usable. If you switch suppliers and order “the same #2 we always use,” you may receive a mailer that no longer fits your product.
How to Measure a Product for a Bubble Mailer
Step 1 — Measure the Product in Its Shipping Condition
Measure the product as it will actually leave your warehouse, not as it sits on a shelf.
If the item ships inside a retail box, measure with the box. The same applies to protective sleeves, tissue wrap, instruction booklets, warranty cards, and any insert you include in the order.
For bubble mailer buyers this matters more than it does for apparel. A rigid retail box adds fixed dimensions that cannot compress, so measuring the bare product will consistently point you toward a mailer that’s too small.
Step 2 — Record Width, Length, and Thickness
Capture all three figures for the packed item.
Thickness is the measurement most often skipped, and for rigid or semi-rigid products it frequently determines the size more than the footprint does. A flat item and a boxed item with the same width and length are not interchangeable when it comes to mailer selection.
Keep these figures in your SKU records so future packaging decisions start from data rather than estimation.
Step 3 — Check Corners and Rigid Edges
Rigid corners and hard edges create fit problems that flat measurements don’t reveal.
A boxed product may look like it fits within a mailer’s stated dimensions while being awkward to insert in practice — corners catch on the lining, and the packer ends up working the item in at an angle. Sharp or reinforced corners can also concentrate pressure at specific points of the mailer rather than distributing it.
This is a meaningful difference from soft goods. Apparel gives way at the corners; a boxed item does not.
Step 4 — Allow Space for Easy Insertion and Sealing
There’s no reliable universal allowance to add, because the right amount depends on how rigid the product is, how the mailer is constructed, and how your team packs.
What matters is that the finished combination works operationally:
- The product slides in without force
- Seams are not stretched or strained
- The product does not sit up into the closure area
- The flap folds down and seals cleanly against the mailer face
A size that requires the packer to push, fold, or angle the product is workable for one order and a problem across a full production run.
Step 5 — Confirm With a Physical Sample Before Bulk Printing
Fit confirmation is worth doing before artwork is finalized, particularly for:
- Rigid items and boxed products
- High-value items where a fit failure is expensive
- Thick products where usable interior space is the constraint
- Any first custom printed order
Custom printing locks you into a size at volume. Discovering a fit issue after a print run is a costly correction, and it’s entirely avoidable by confirming with a physical sample first.
What Size Bubble Mailer Do I Need?
What Size Bubble Mailer for Jewelry and Small Accessories?
Jewelry and small accessories are commonly shipped in smaller bubble mailer sizes, since the products are light and benefit from some cushioning. The correct size depends on what ships with them.
Most jewelry doesn’t ship bare. A ring might travel inside a jewelry box, a pouch, and a display card — and the box is the dimension that actually determines the mailer. Measure the complete finished presentation, including any branded packaging, rather than the item alone.
If the box is rigid, treat corner clearance as part of the decision, not just the footprint.
What Size Bubble Mailer for Trading Cards or Small Collectibles?
Measure the card in its full protective assembly, not the card itself.
Collectibles typically ship inside layered protection — a sleeve, then a top loader or rigid holder, sometimes with a team bag or backing board over that. Each layer adds width, length, and thickness. The combined stack is what needs to fit.
Because these protective holders are rigid, insertion clearance matters more than it would for a flexible item of the same footprint.
What Size Bubble Mailer for Books?
Book dimensions are easy to measure, which makes them deceptively easy to get wrong.
Width and length are straightforward, but thickness varies considerably — a hardcover with a dust jacket occupies noticeably more depth than a paperback of the same page count. Hardcovers also have firm corners that need clearance during insertion.
Multiple books cannot be sized by scaling up from a single book. Stack them as they will ship and measure the bundle as one unit; the combined thickness is usually what drives the size up.
What Size Bubble Mailer for Cosmetics?
Small cosmetic products are often shipped in bubble mailers, but suitability depends on the container more than the size.
Consider what you’re actually shipping. A rigid plastic compact behaves very differently from a glass bottle. Product shape, container material, and leakage risk all affect whether a bubble mailer is the right format at all — not just which size to choose.
A bubble mailer should not be assumed sufficient for all glass or liquid products. For fragile containers or items with spill risk, evaluate additional inner packaging, or consider whether a rigid shipping format is more appropriate. Sizing is a separate question from whether the format suits the product.
What Size Bubble Mailer for Small Electronics?
Small electronics almost always ship with more than the device itself, and the accompanying items usually determine the size.
Account for the retail box, cables, adapters, documentation, and any accessories included in the order. Retail boxes for electronics tend to be rigid with defined corners, so both the packed footprint and insertion clearance need checking.
Bubble mailers provide cushioning, but they are not a protective solution for every electronic product. Higher-value or more impact-sensitive items may warrant additional inner protection or a different shipping format entirely.
What Size Bubble Mailer for Multiple Items?
Measure the complete packed bundle, not each item separately.
Individual measurements don’t combine predictably. Rigid items don’t nest or compress against each other the way soft goods do, so the assembled bundle often needs more room than the sum of the parts would suggest — particularly in thickness.
If multi-item orders are a regular part of your mix, measure a real representative order rather than estimating from single-unit figures.
Why Bubble Lining Changes the Fit
A plain poly mailer relies on a single flexible film that wraps around whatever is inside. A bubble mailer adds a cushioning layer between that outer film and your product.
That layer occupies interior space. Two mailers with identical exterior dimensions — one plain poly, one bubble-lined — should not be assumed to offer the same usable capacity.
A few consequences follow from this:
- Cushioning consumes part of the nominal interior space
- Thicker products reduce the remaining working room further, since depth is where the constraint concentrates
- Rigid items do not compress against the lining the way folded apparel does, so the available space has to genuinely accommodate them
- Seam construction and the closure area also reduce the space usable for the product
This is the main reason exterior dimensions are a weak basis for bubble mailer selection, and why confirming usable interior dimensions with your supplier is worth the extra step.
6 Common Bubble Mailer Sizing Mistakes
1. Choosing by Exterior Size Alone
Exterior dimensions describe the mailer, not the space available for your product. Selecting on that figure alone tends to produce mailers that are tighter than expected once the lining and seams are accounted for.
Ask suppliers for usable interior dimensions, and make that the number you size against.
2. Ignoring Product Thickness
Depth is where bubble mailer capacity runs out first, and it’s the measurement most often left out of the decision.
This affects rigid products disproportionately. A boxed item cannot flatten under the seal the way a folded garment can, so its full thickness has to be genuinely available.
3. Forgetting the Product’s Retail Packaging
Measuring the bare product when it actually ships inside a box, case, or sleeve is one of the most common sizing errors in this category.
The retail packaging is usually the rigid, non-negotiable dimension. Measure the item exactly as it will be handed to the packer.
4. Assuming Trade Size Numbers Are Universal
A #0 or #2 from one supplier will not necessarily match the same designation from another, in either exterior dimensions or usable space.
If you reorder by trade number alone after changing suppliers, verify the actual dimensions before the order ships. Confirming in writing takes minutes and prevents a full run of unusable stock.
5. Choosing the Smallest Mailer That Fits
A mailer that only just accommodates the product creates ongoing operational friction. Packing slows down, seams take strain during insertion, and the product can interfere with the closure area — which makes clean sealing harder.
Size for how the mailer performs across a full run, not for whether a single unit can be worked in.
6. Ordering Custom Printed Bubble Mailers Before Confirming Fit
Custom printing commits you to a specific size at volume, and a fit problem discovered afterward cannot be corrected cheaply.
The reliable sequence is: confirm fit with a sample, finalize artwork for that confirmed size, then move into bulk production.
Bubble Mailer or Poly Mailer?
Both formats handle sizing differently, and the choice usually resolves quickly.
Bubble mailers are generally suited to:
- Products that benefit from cushioning
- Rigid or semi-rigid items
- Products vulnerable to scratches or minor impact during transit
Poly mailers are generally suited to:
- Soft apparel and textiles
- Flexible, non-fragile goods
- Products that don’t require cushioning to arrive in good condition
If your catalog is mostly soft goods, custom poly mailers are likely the more efficient starting point, and our poly mailer size guide covers sizing for folded apparel in detail. For a fuller comparison of the two formats across cost, protection, and presentation, a dedicated poly vs. bubble comparison is a better reference than this sizing guide.
Should You Keep Several Bubble Mailer Sizes?
A single bubble mailer size can be workable when:
- Your catalog is narrow and consistent
- Products have similar packed dimensions
- Order composition rarely varies
Multiple sizes tend to make more sense when:
- Your products ship in retail boxes of differing dimensions
- Thin and thick items are mixed within the same catalog
- Single-item and multi-item orders both occur regularly
If you decide to stock more than one, sorting SKUs into small, medium, and large groups is usually enough structure to work with. Assign each group a size based on your own measurements of the bulkiest product in that group — the specific sizes should come from your packed dimensions, not from a general recommendation.
Bubble Mailer Size Selection Checklist
Before placing a bulk order, confirm:
- Product packed width: ______
- Product packed length: ______
- Product packed thickness: ______
- Retail box / inner packaging included: Yes / No
- Product has rigid corners: Yes / No
- Supplier provides usable dimensions: Yes / No
- Closure flap included in stated length: Yes / No / Confirm
- Candidate bubble mailer size: ______
- Sample fit confirmed: Yes / No
- Product inserts without force: Yes / No
- Closure seals without tension: Yes / No
If the usable dimensions and sample fit lines are still unresolved, settle those before committing to a custom printed production run. They’re the two items most likely to cause an expensive correction later.
When Should You Request a Sample?
Confirming fit with a physical sample is worth the step in these situations:
- Rigid products and anything shipping inside a retail box
- Thick products where usable interior depth is the constraint
- High-value items
- Orders that regularly contain several items
- Deciding between two adjacent sizes
- Any first custom printed bubble mailer order
If you’re planning a custom bubble mailer order, confirm the size against your packed product before artwork is finalized. Keeping the sequence in order — size first, then artwork, then bulk production — avoids the most expensive mistake available in custom packaging procurement.
Bubble Mailer Size FAQ
What is the most common bubble mailer size?
There isn’t a single dominant size. Bubble mailers are sold across a wide range of dimensions and trade-number formats, and the right choice depends on your packed product and the usable interior dimensions of the specific mailer, not on general popularity.
Are bubble mailer sizes inside or outside dimensions?
It depends on the supplier. Many list exterior dimensions, but the space available for your product is smaller once lining, seams, and the closure area are accounted for. Ask for usable interior dimensions before ordering in volume, especially when comparing quotes.
What does #0 or #2 mean on a bubble mailer?
These are trade-size designations used to categorize bubble mailers, with higher numbers generally indicating larger sizes. They aren’t a universal standard — dimensions behind the same number can differ between suppliers and constructions. Order against actual stated dimensions rather than the number alone.
What size bubble mailer should I use for a book?
Measure the book’s width, length, and thickness, then compare against the usable interior dimensions of candidate mailers. Hardcovers need more depth and corner clearance than paperbacks of the same footprint. For multiple books, measure the stacked bundle as a single unit.
Should a bubble mailer fit tightly?
No. The product should slide in without force and allow the flap to seal cleanly against the mailer face. A fit that requires pushing or angling the item slows packing and puts strain on the seams — while excessive empty space is its own problem.
Do bubble mailers have less usable space than poly mailers of the same exterior size?
Generally yes. The internal bubble lining occupies space that a plain poly mailer doesn’t, so identical exterior dimensions should not be taken to mean equal usable capacity. Confirm the usable interior figures rather than assuming equivalence between formats.